 Branding
 Digital Marketing
 Web & App Dev
 IT Services
How to Back Up and Restore a Drupal Website
In the old days, system administrators backed up files on a regular schedule so that they could recover after disk errors or a faulty software upgrade. Now that hacker incursions are so common, backups aren’t just good IT practice: they’re an essential part of security management. A comprehensive security plan isn’t just about preventing attacks. It’s also about getting your business back online after an attack or some other systems disaster.
Without regular backups the road to disaster recovery can take a lot longer, require more expertise than you have in-house, and end up being far more expensive than the effort of performing regular backups. How often you back up depends on how dynamic your website is, but you should do it at least once a week.
1. Housekeeping: separate core from add-ons
Please do this! A tidy set of folders makes sense for daily operations. During a crisis, when every minute matters, if you need to bring in outside help, separation of core files from add-ons makes it a lot easier for someone who’s unfamiliar with your configuration. A straightforward folder structure makes it easy for any Drupal professional to find what he or she needs. Create folders for modules and themes in the Sites folder instead of downloading contributed or custom modules and themes right into the Modules and Themes folders.
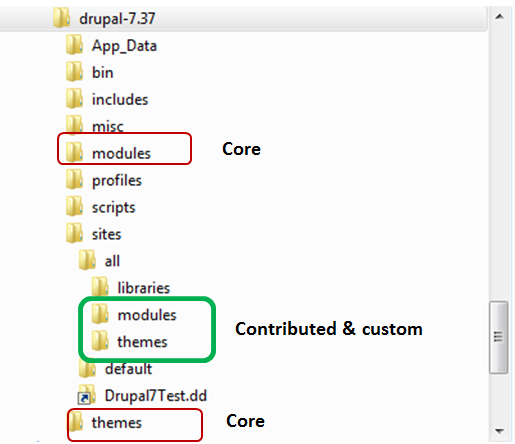
This folder set up is a Drupal best practices requirement; if you install modules using the ‘Install from a URL’ option, Drupal will automatically install into the Sites/All/Modules folder. If you prefer or need to upload manually, make sure you extract the compressed file(s) into the correct folder.
This set up allows you to reinstall core files quickly from scratch, should you need to, without overwriting your custom/contributed files. Please follow this best practice!
2. Backing up: files and database
A Drupal website consists of files and a database. Website administrators who are familiar with FTP, Drush, or PHP may choose to use those tools for backup; a quick search online will turn up articles on what to do.
In this blog we use Backup and Migrate, a popular contributed module that backs up, restores, and migrates. It also automates scheduled backups.
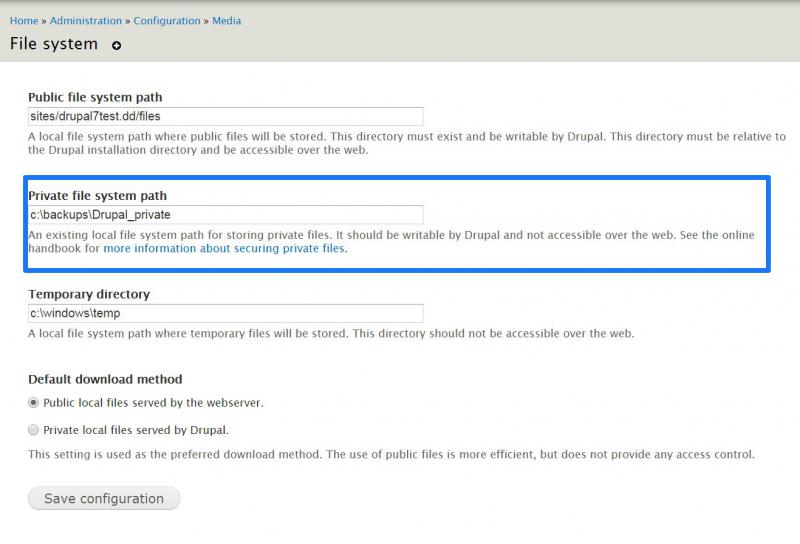
Once you’ve installed Backup and Migrate and read its README.TXT for any recommendations relevant to your site before enabling the module. The first time you access this module, you’ll see a warning to set up the private file system path:
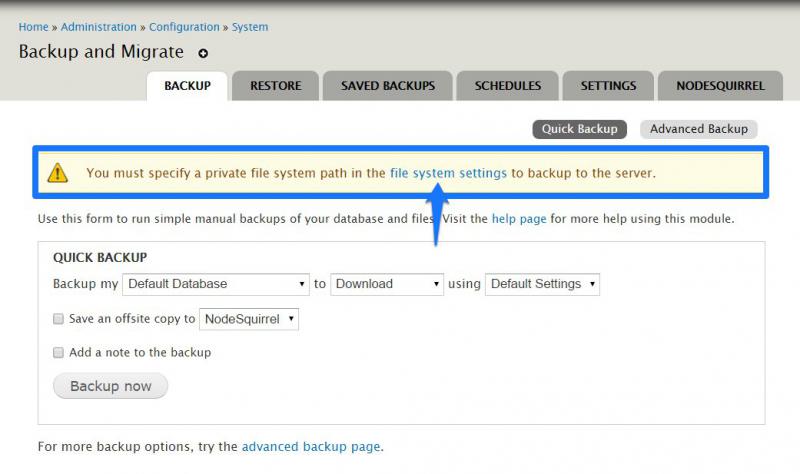
Click on the file system settings link which takes you to Administration / Configuration / Media to set up paths. Enter paths to the server and directory you’re using to store backups. It should be a safe location on a different server than your website, not accessible over the web, and to which Drupal has write access.
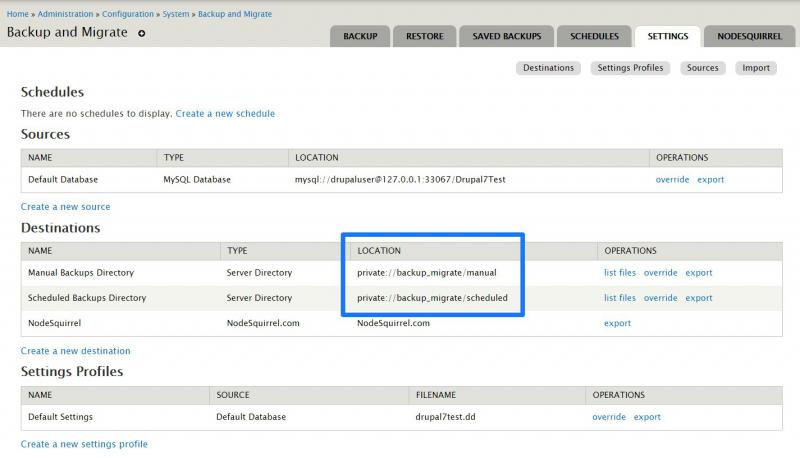
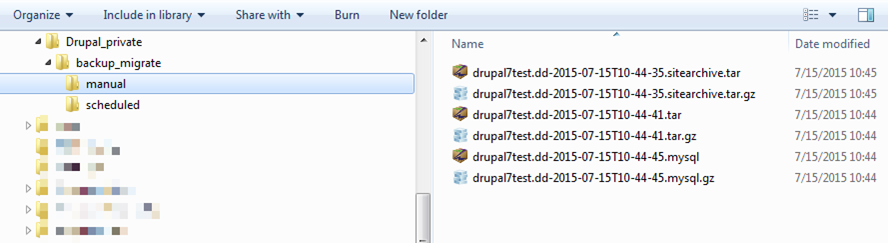
Now when you return to Backup and Migrate, you can access the Settings tab see your settings and destination paths:
NOTE: In the example above, the location of ‘private://’ resolves to ‘c:\backups\Drupal_private’.
Before anything else, here's a quick rundown of some terminology:
- Destinations: are the locations where you save backup files to, or load them from. You can save backups to a server directory, your desktop, or send them via email to a specific account. Use the Settings tab to create, edit, or delete destinations or to see a list of backup files in the available destinations.
- Sources: are just the files, directories, or databases to backup.
- Profiles: are backup settings which are saved by name, to use for scheduled or manual backups. Profiles store backup file names, compression options, timestamp settings, and more.
- Scheduling: automates your backups on a regular basis using the cron job scheduler (by default). Whenever cron runs, it will check to see whether it needs to run a backup. This means if cron runs once a day but you’ve scheduled backups twice a day, cron will only do one backup – you can’t run backups more often than cron is configured to run.
The major tabs for Backup and Migrate are:
- Backup
- Restore
- Saved Backups
- Schedules
- Settings
- Nodesquirrel: a cloud-based backup service
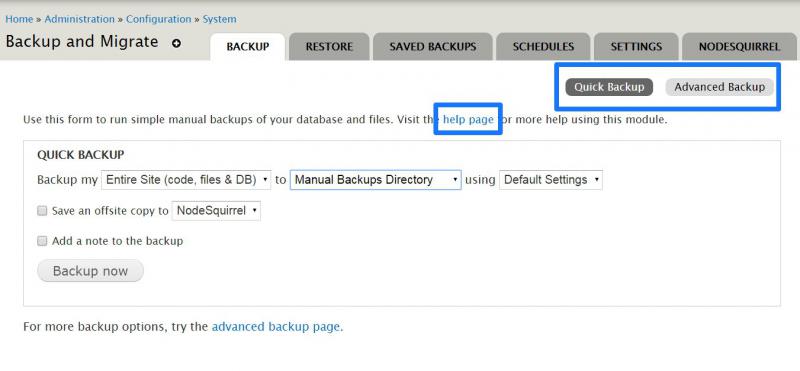
Backup
You can run a simple manual backup by specifying the database or files you want backed up:
- Default Database: your current, active Drupal database
- Public Files Directory: generally this contains files that you upload, such as images
- Entire Site: everything
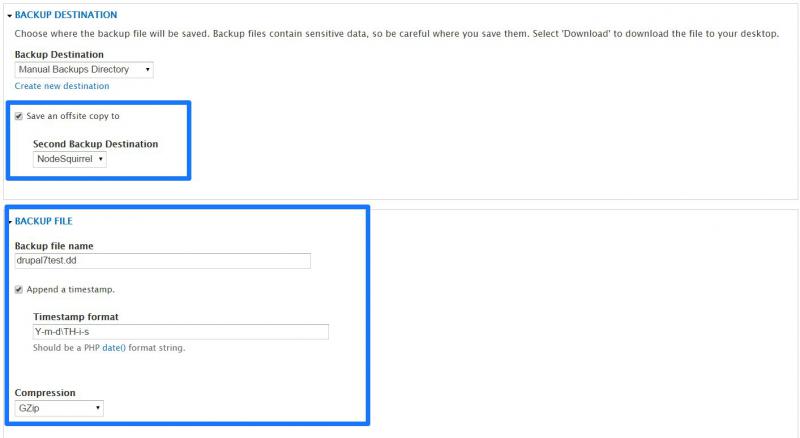
Then specify the destination directory and settings. In the example below, we are backing up just the database to the Manual Backups Directory.
There is a button to the advanced backup page which lets you change options such as:
- backup file name
- time stamp format
- compression format
- email notification, and more
Save a copy to a second destination is useful when you want a copy of your website from a particular point in time – such as just before you do a major upgrade of software or content, and want to keep an extra copy somewhere just in case.
You’ll notice a setting on this page for Default Database Backup options which allow you to exclude entire database tables or data from those tables. Do not change the default settings unless you have a really good reason and know what you’re doing. Backup and Migrate includes features which are useful to developers, but not necessarily for website administrators.
Test out a manual backup to see for yourself that your backup files have gone into the designated private file system path (below). You can change this path at any time and Backup and Migrate will default to the new path.
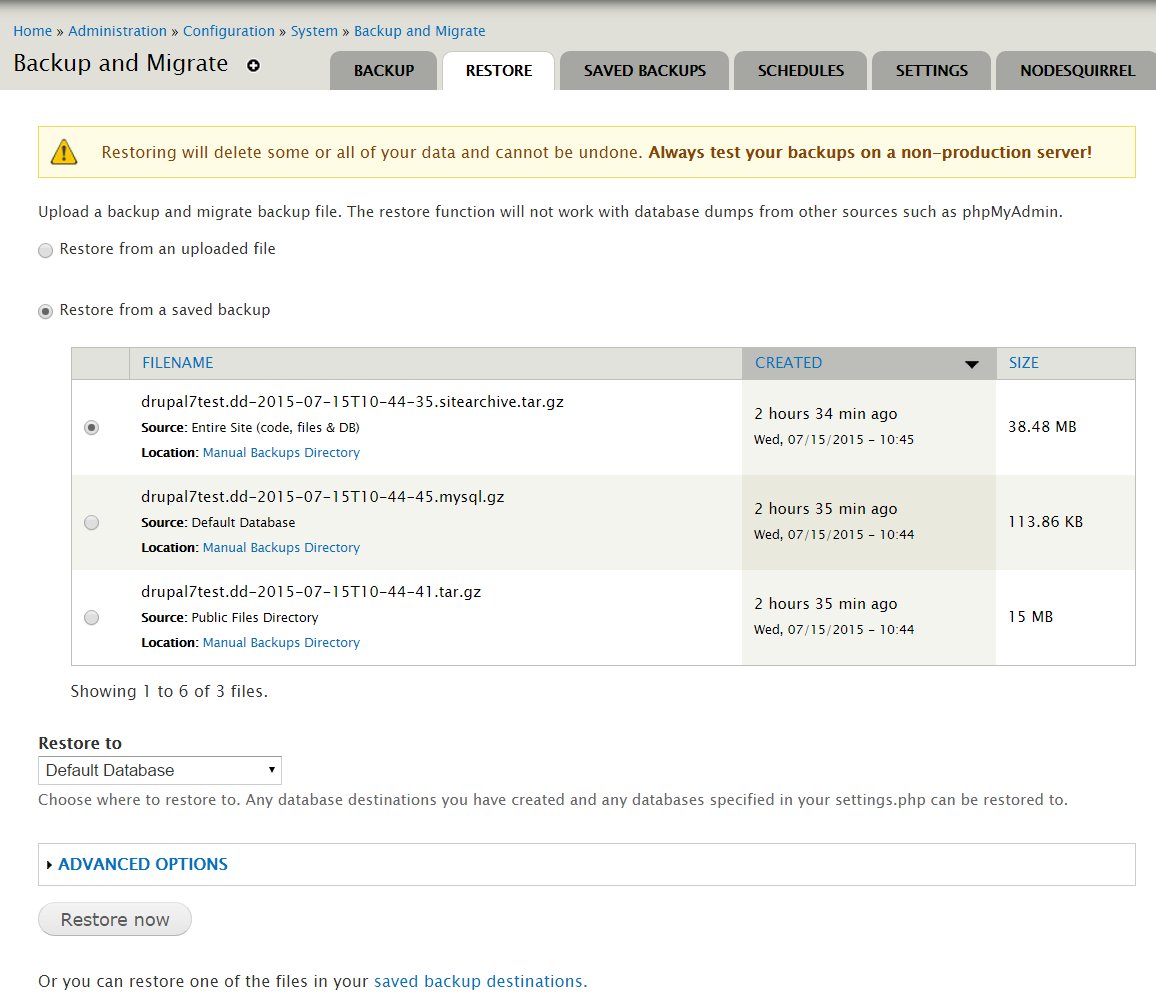
Restore
Restore from a Backup and Migrate backup file or some other compatible file. In the example below, we’ve selected Restore from a saved backup and this brings up a list of available backup files.
Saved Backups
To see your list of backup files stored in the default private system file path.

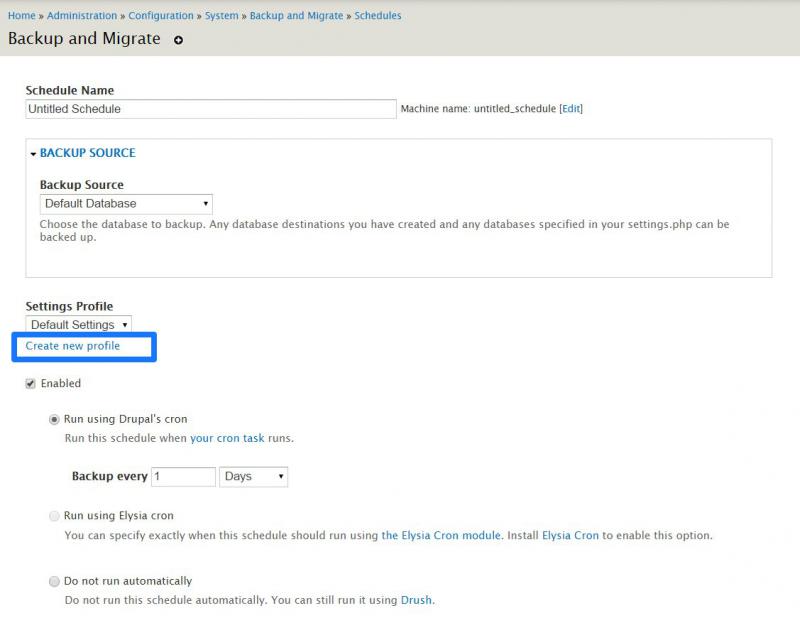
Schedules
To automate your backup schedules, click on Add Schedule. This lets you schedule backups to be run by the job scheduler you select, such as cron, Elysia cron, or Drush. You can also change the Settings Profile to use advanced settings by selecting Create new profile, which gives you the same options as from the advanced backup page to change options such as: backup file name, timestamp format, compression format, email notification, and more
Automatically delete old backups is useful for website administration. Select this to manage disk space by specifying how many backup files to keep for scheduled backups.
Save a copy to a second destination is also available from Schedules.

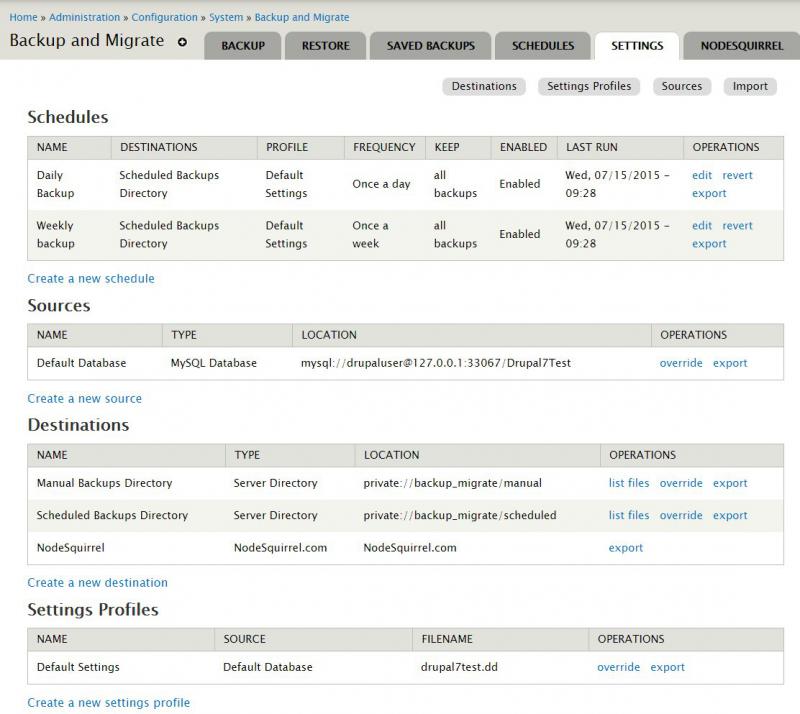
Settings
This provides an ‘at a glance’ view of settings for schedules, sources, destinations, and settings profiles.
3. Restoring from backup
If you’re just bringing back an earlier version because new software didn’t work or because of file corruption, it’s simple. You just
- Click the Restore tab
- Select a saved backup from a time prior to the software or hardware fail
- Click the Restore now button ... and it’s done!
However, if you get hacked or suspect you’ve been hacked, the process gets more complicated. When security measures fail and your Drupal site is breached, you must recover your website from a clean backup and apply the security updates. You may also need to use the backup to compare a copy of the website from its last clean state against the breached version to:
- Identify and assess unauthorized changes to content and files: what was the extent of the damage and how do they affect users and your organization?
- Identify authorized changes that you should make to content and files before bringing the website back online
Next week’s blog How to Restore a Drupal Website After It's Been Hacked will discuss in more detail what to do when restoring after an attack.
4. Practice Makes Perfect
Maintain a staging server that mirrors your production environment. Not only is this essential for testing out software upgrades, a staging server lets you validate your backup files and also your backup and recovery process. Every so often, it’s a good exercise to run through your website recovery procedures on a non-production server. This ensures that:
- Your documentation for backup and recovery is accurate. Update information and edit content to remove ambiguities.
- Your backup and recovery process actually works. Identify deficiencies in the process and create contingency plans.
- Staff get the opportunity to become familiar with the process. When a real crisis happens, you don’t want to be walking through website recovery steps for the first time.
- Backup files get validated every so often. Sometimes backups, even automated ones, can fail due to human error, hardware, software, network, or media problems.
Finally, make sure you have more than one backup method. PHP, Drush, and FTP are good contenders.
For more best practices about backup and recovery, read the blog Why “We Back Up Every Night” is Not a Disaster Recovery Plan.
Backups are more essential than ever. They’re no longer just to safeguard against system failures. They’re your best hope of getting back online quickly after a security breach. While no website is 100% secure, regular backups and prompt software updates reduce your website’s vulnerability to attacks. If you lack resources to ensure regular updates and backups for your website, contact us for more information about Smartt’s web services.

