 Branding
 Digital Marketing
 Web & App Dev
 IT Services
Drupal Panels: A Tutorial for Site Editors
In our last Drupal blog, we demonstrated how to use blocks in Drupal 7 when you want to show content in a different region or add a new ‘block’ of content to your existing layout. If your theme doesn’t support the layout and regions you need, however, the Panels module gives you the option to create customized displays for content. This tutorial walks through an example using Panels to change the look of an existing content type. There are plenty of other use cases for Panels, they're just not within the scope of a single blog.
The first thing to do is to install the Panels module from Drupal. If you don’t have cTools, you will need to install it. Then you’ll need to enable four modules:
- Panels: Panels, Panels In-Place Editor
- Chaos Tool Suite: Chaos Tools (CTools), Page manager
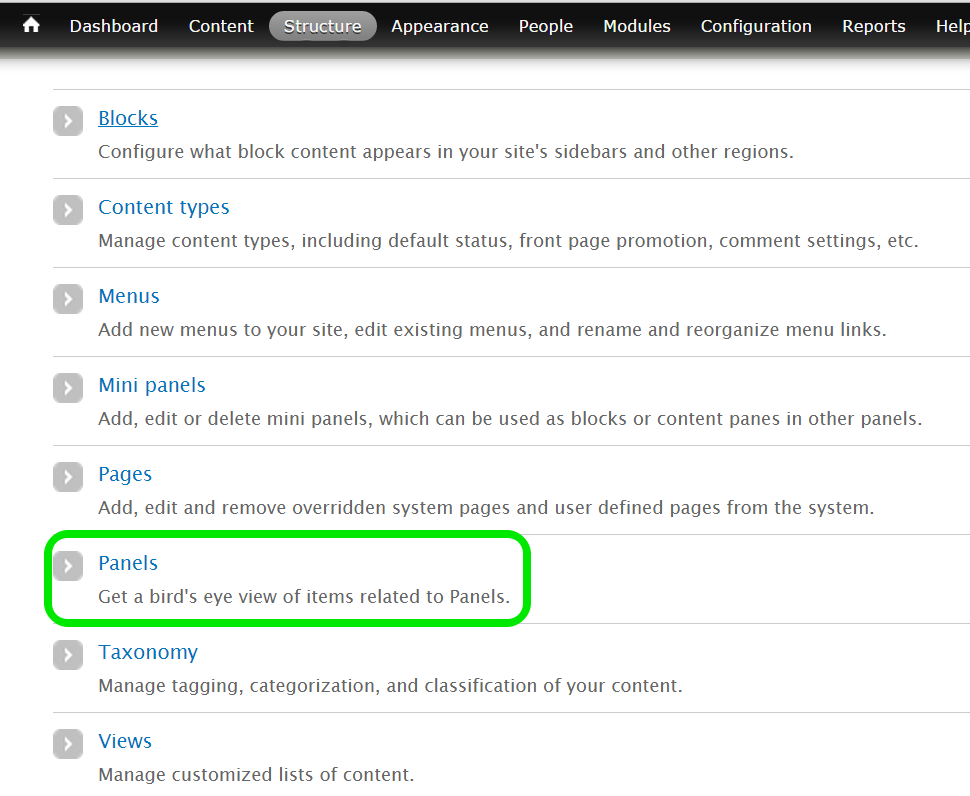
Once you do this, you’ll see Panels appear under the Structure menu.
How to change the look of an existing content type
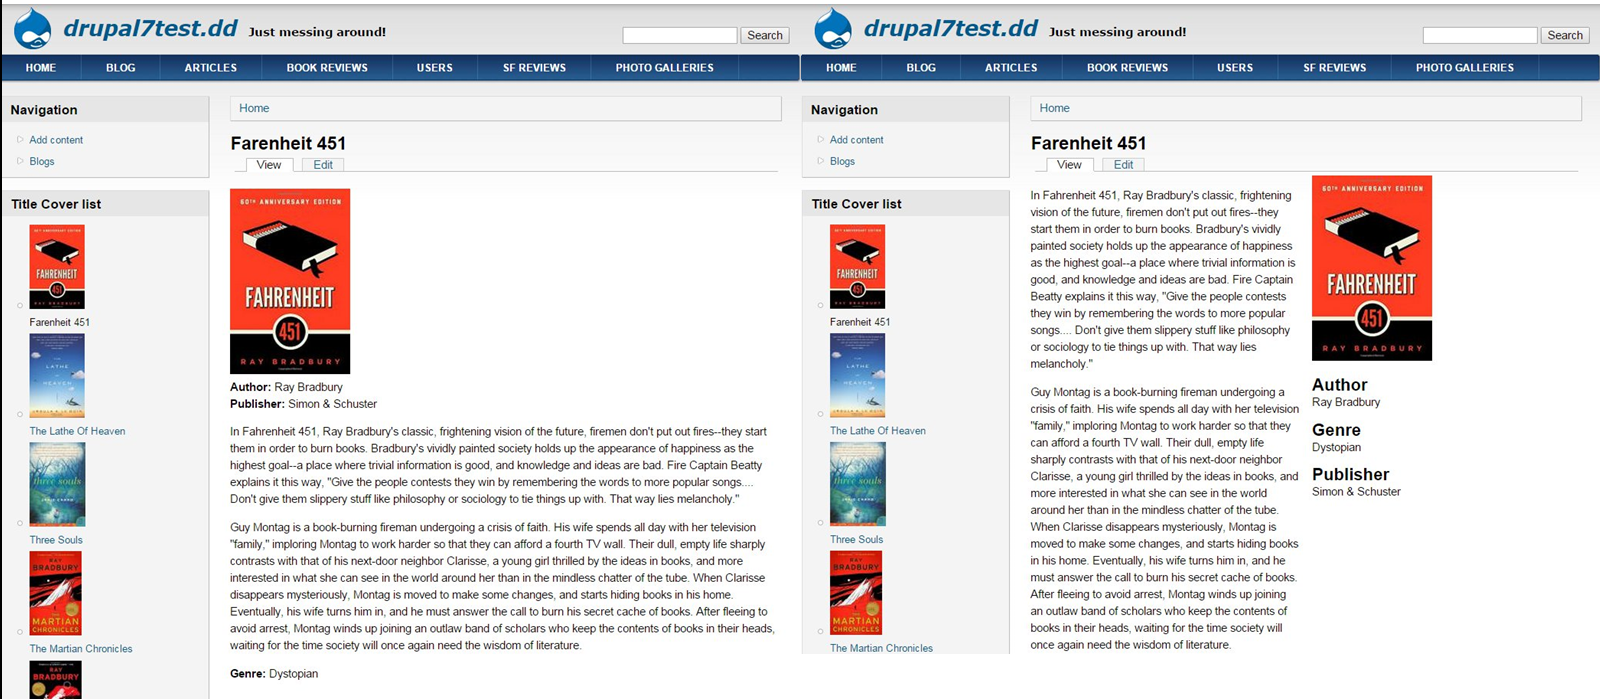
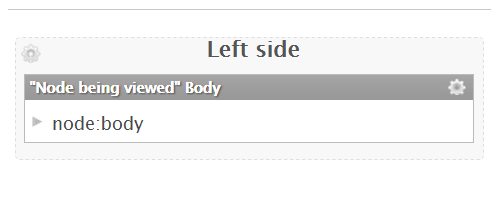
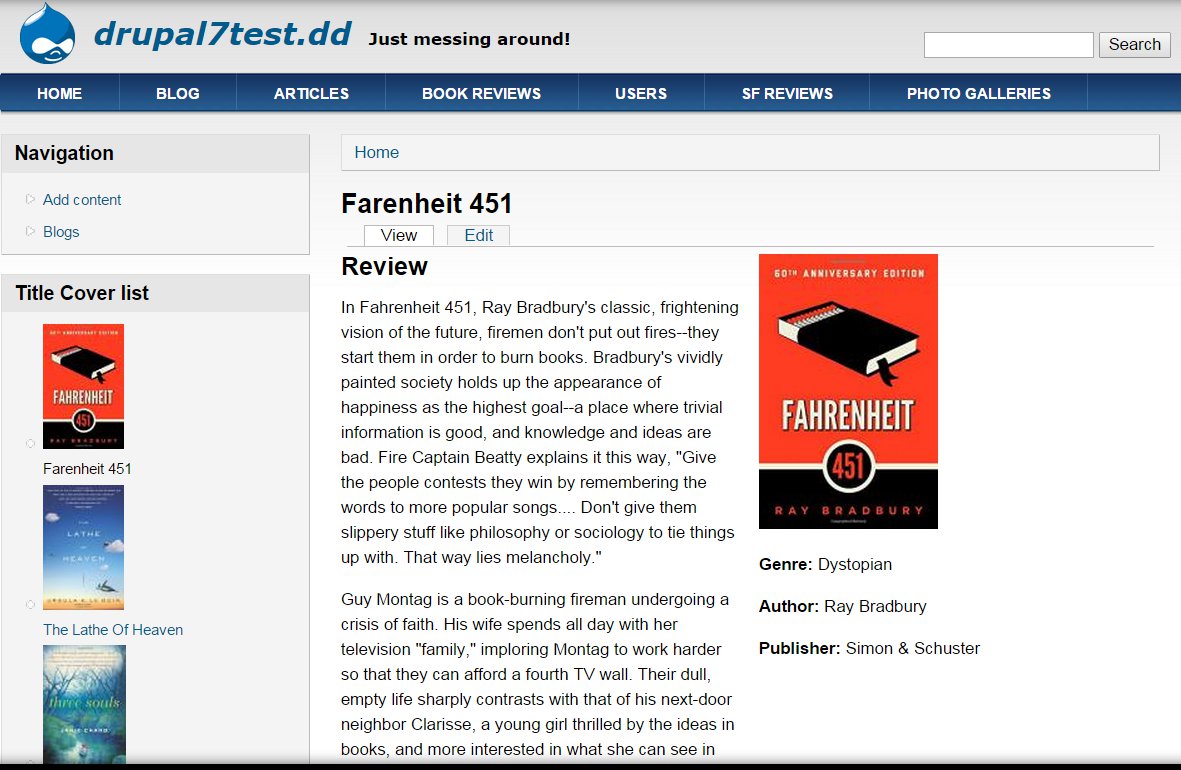
Our demo site uses Drupal 7 and the Danland theme. We’re going to apply Panels to a custom content type we built previously, called Book Review. This content type allows content editors to enter a review, upload a cover image, and enter author name, publisher name, and genre. The layout defined by Danland provides a single column of main content, which contains all those fields (below, left). Using Panels, we will create a different look for this content type: a two-column layout (below, right) that puts the text of the review in one column and the rest of the content (image, genre, author, publisher) in another column. (related article: Drupal 8 Arrives: Top New Features)
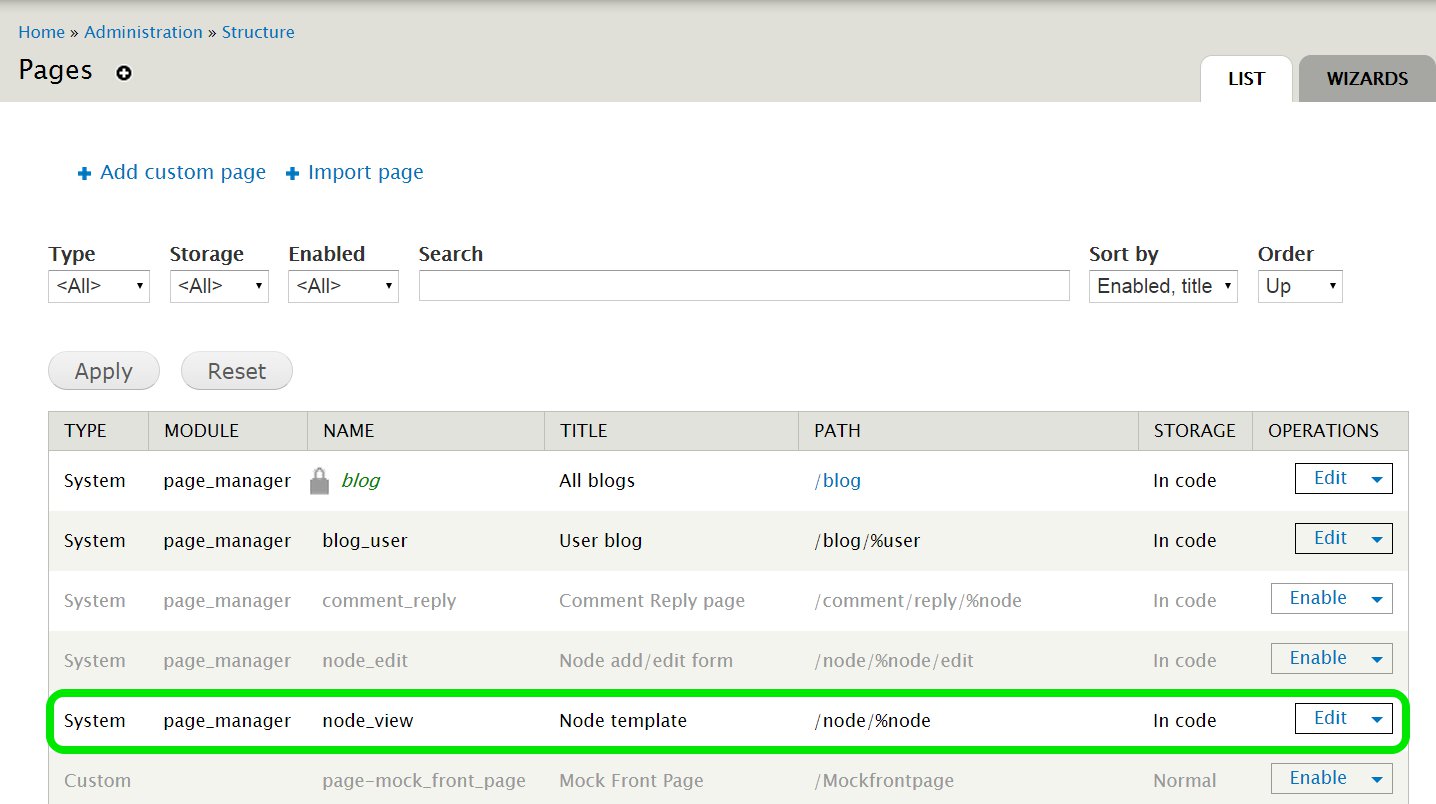
The Panels module works in conjunction with Page Manager, so we begin at Administration / Structure / Pages. The titles in black shows all the pages enabled and being managed by Page Manager. We want to work with Node Template, which defines how Drupal controls the display for existing nodes (pieces of content). First we need to enable Node Template, then Edit.
From the Node template menu, we want to Add a new variant, which then brings up the Add variant page. Think of variant as ‘version of how this content gets displayed’.
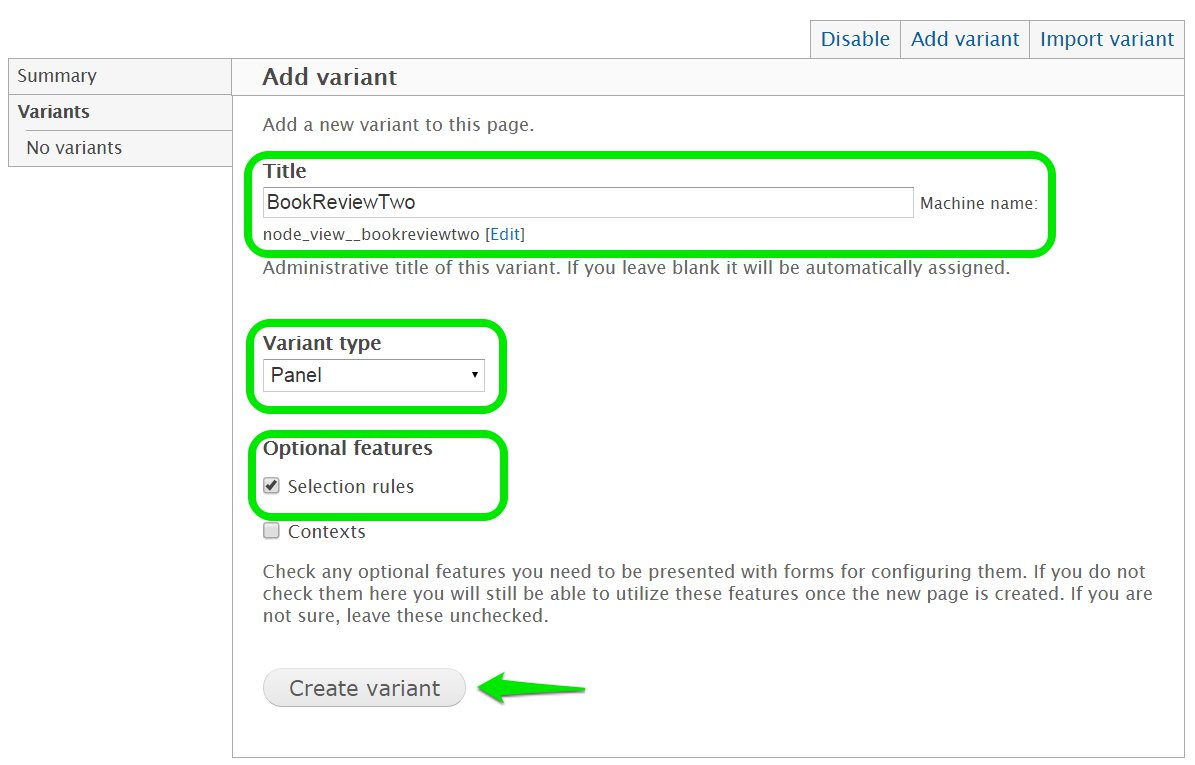
- Title: for administrative use only, so provide a descriptive title that helps you remember what it’s for
- Variant type: Panel
- Optional features: the important one is Selection rules; this is what provides us with more control over the page display.
Now that we’ve created the variant BookReviewTwo (for a 2-column layout), it’s time to configure it. The Configure page will ask us about selection rules, layout, panel settings, and panel content.
To configure selection criteria, we select Node: type from the drop-down menu of available criteria, because we want to change the display of a content type.
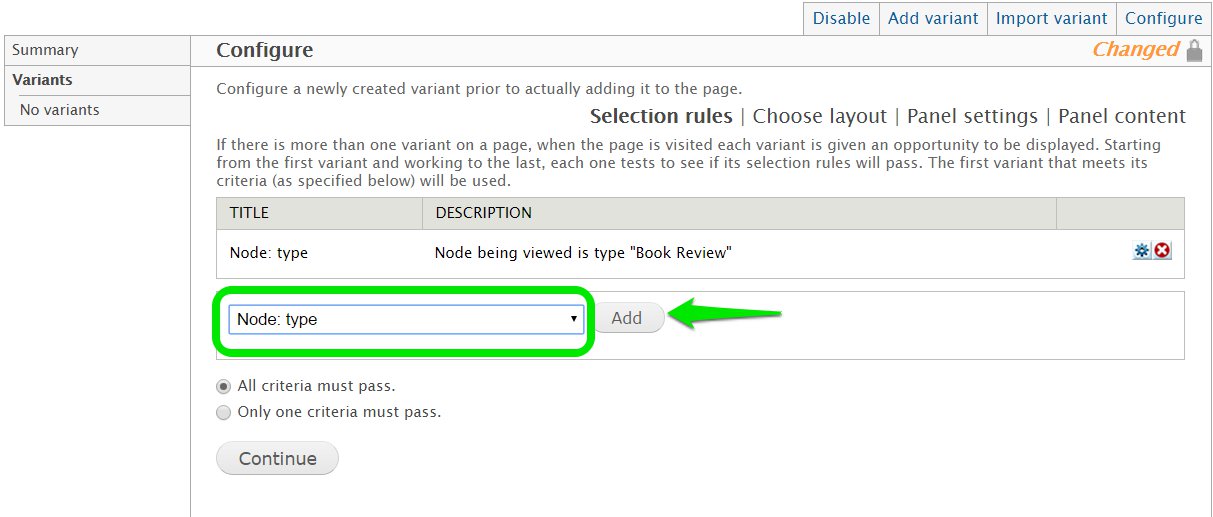
When we press Add, we can select node type (content type) Book Review from the pop-up menu.

Save to return to the Configure Selection Rules menu. There is only one criteria, so ‘All criteria must pass’ is fine. Then Continue to move on to choosing the layout.
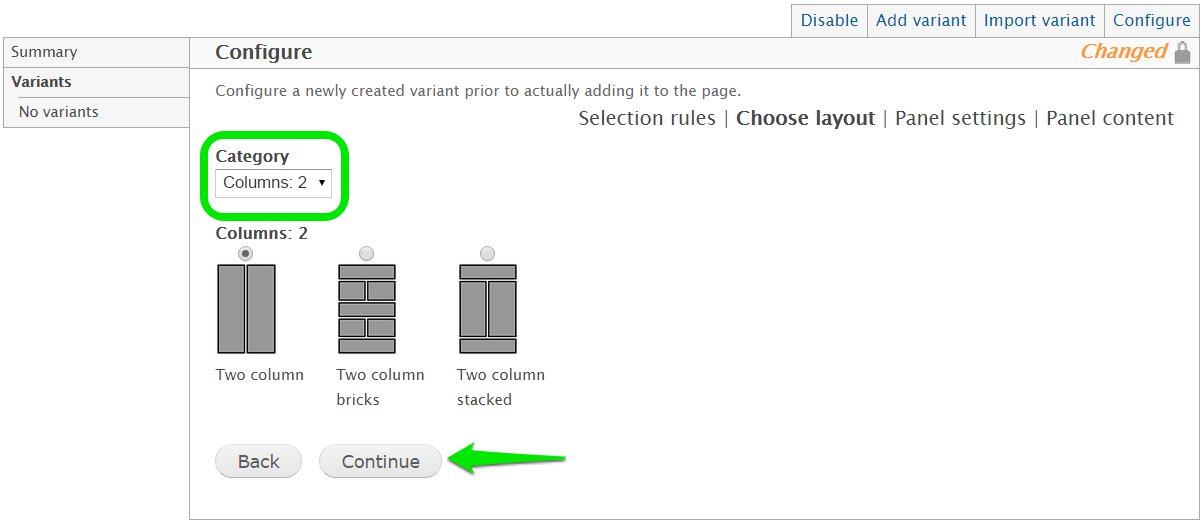
In this case, we choose category Columns:2, which brings up options for 2-column layouts.
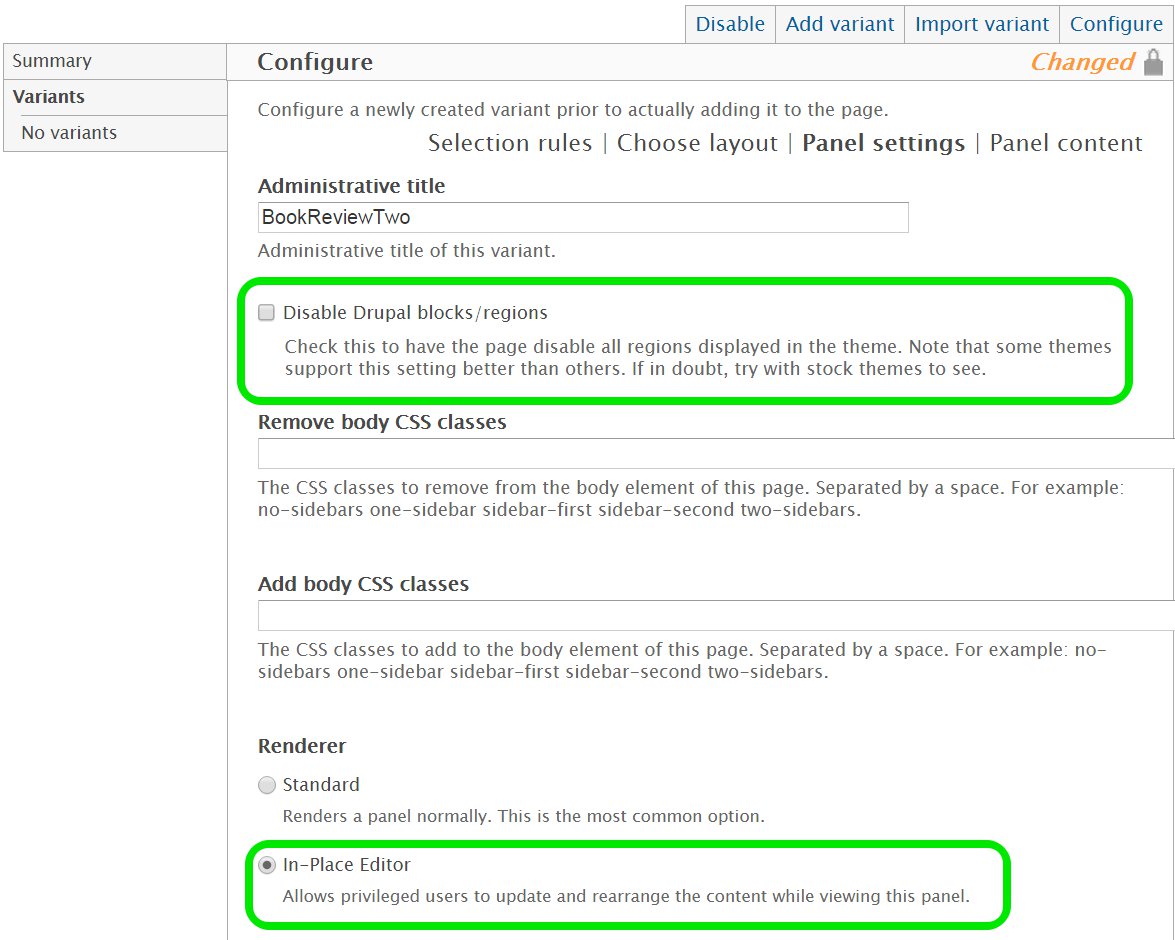
In the next set of configuration choices, there are two options of note. One is relevant to the design and one adds editing flexibility.
- Disable Drupal blocks/regions: means just that. If you select this, Drupal won’t render any blocks or regions originally assigned to this page, such as sidebars. However, since we do want to keep the overall look of Book Reviews consistent with the rest of the website, we want to keep the sidebar and we won’t select this.
- Renderer: the In-Place Editor allows further changes once the layout goes live, which is not always a good thing. However, since we want to demonstrate Panels, we are selecting this option.
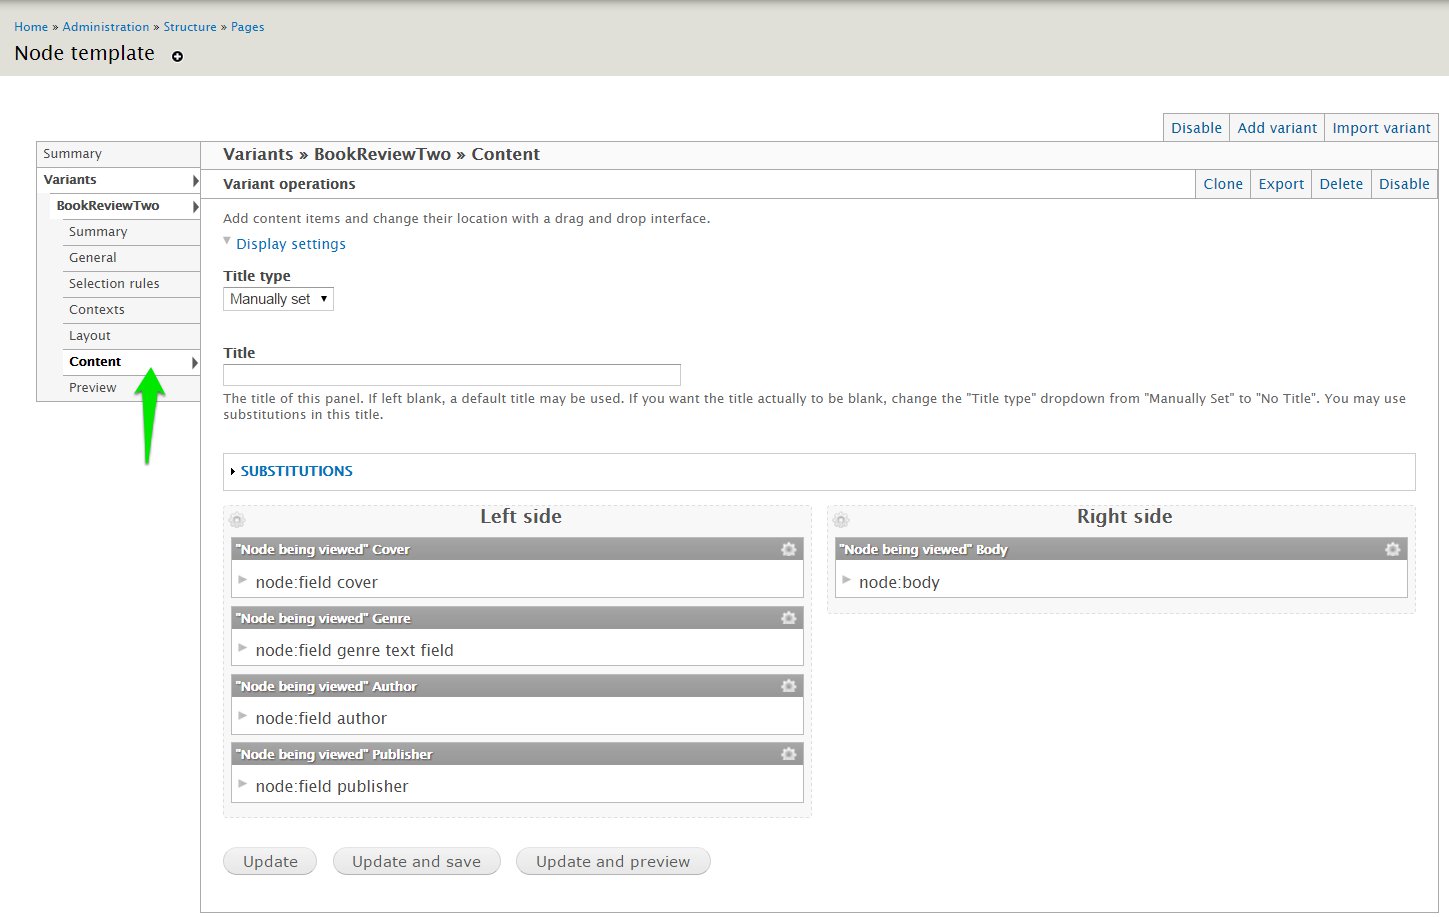
The next and most fun part of Panels is where we get to (finally) define the content we want to add and arrange. Note that there are two ‘columns’, Left side and Right side, with a cog wheel on the top left of each. To start adding content to the Left side, we click on its cog wheel to select Add content.
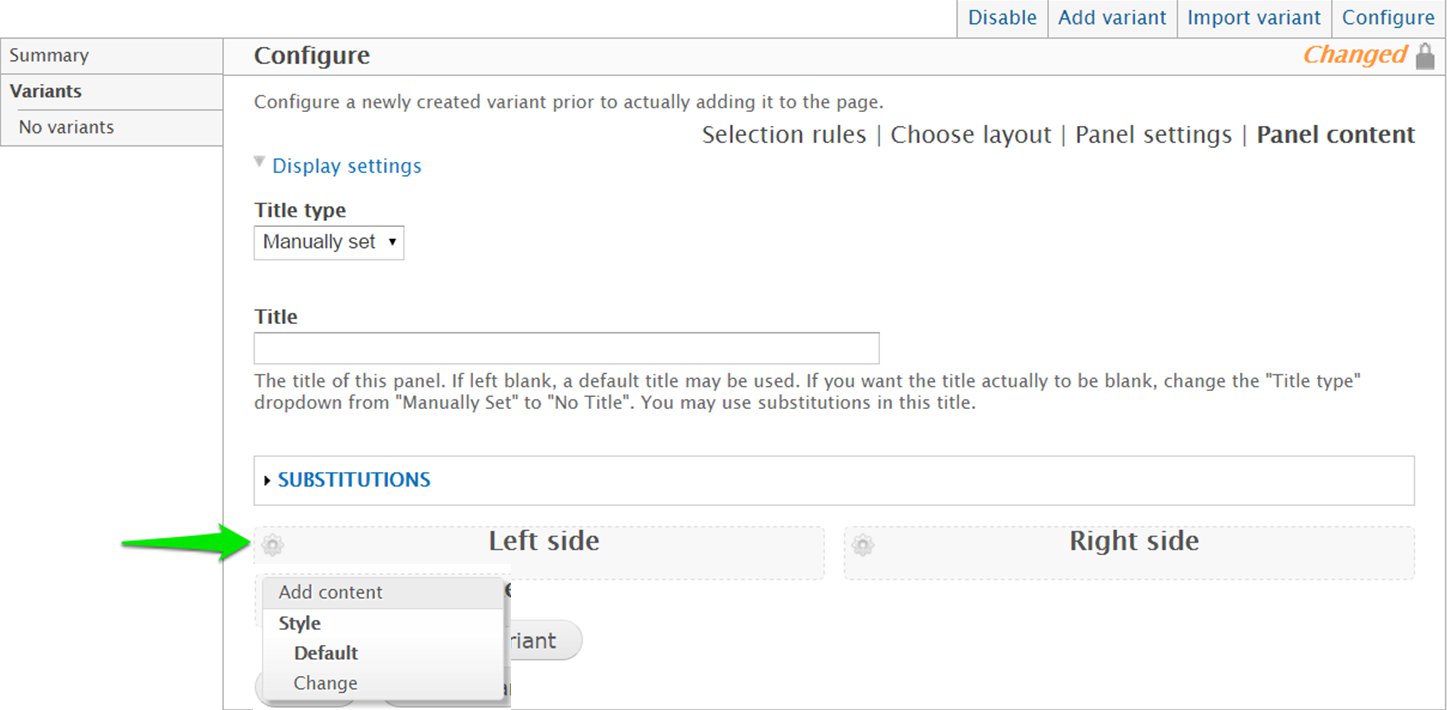
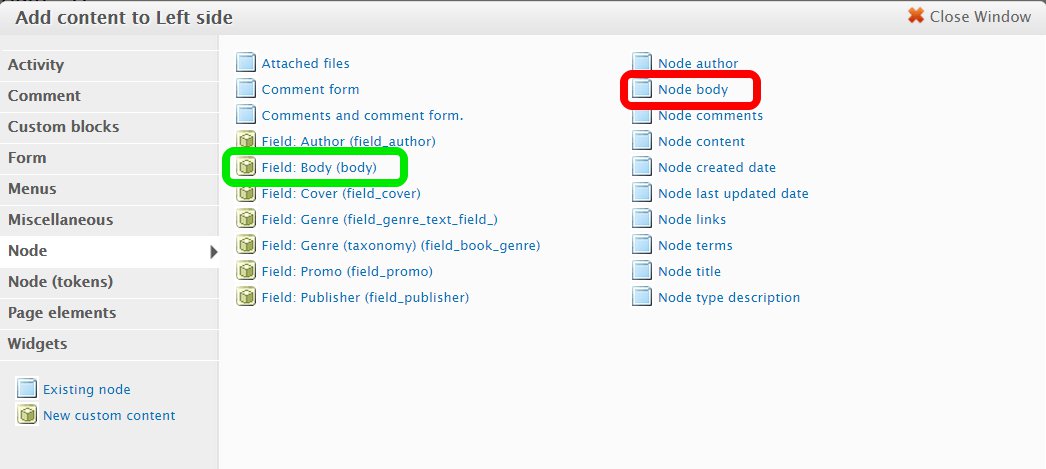
This brings up a pop-up menu of relevant content we can add to the Left side column. What this means is that even if Book Review’s original content type was very basic, Panels and Page Manager let us add more content to the layout we’re creating. We could add a Comment Reply Form from Comments, Page elements such as Help or Secondary navigation links, or an Activity monitor such as Who’s online. For now, we just need to add Field: Body.
NOTE: But why not Node content? Because Node content will add all the content from the node to this column in one big chunk. We want more granular control. We want the ability to arrange the different pieces of content between two columns.
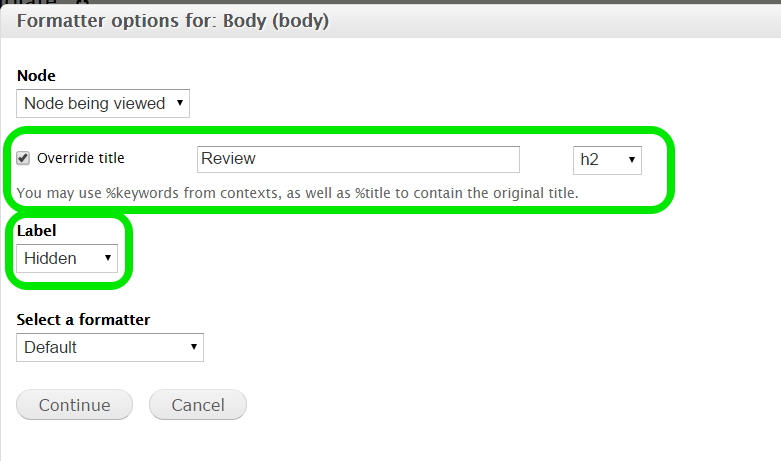
The next configuration page contains two selections that we want to change for this piece of content: Label and Title.
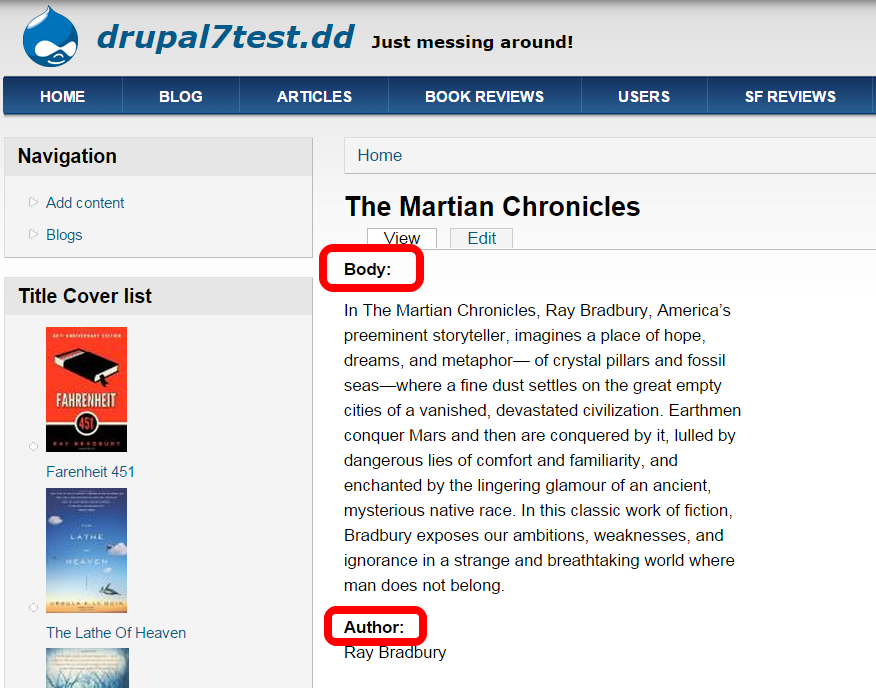
- Label: unless the label is descriptive and useful and you want it to display, keep it hidden. See what happens (below) when you don’t hide a label. It could look irrelevant and therefore sloppy. Sometimes you do want to display the field name as a label - Author, for example.
- Title: In this exercise, not only will we hide the label, we will override the title with the text ‘Review’ in an H2 header format.
Now, we see that node: body appears in the Left side column.
To add more content, we click again on the cog wheel to add other node content such as: author, genre, publisher, and the cover image.
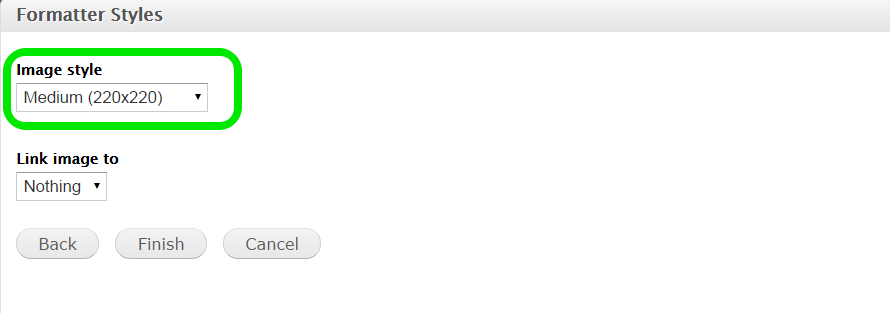
NOTE: When formatting image styles (below), we have the option to configure the image to be the full, original size of the image or a thumbnail. Thumbnails are image styles derived from the original image, so you don’t lose the original image. Thumbnails are created according to the image style setting, rendered, and cached. This speeds up performance. To maintain consistency, we select a medium thumbnail size.
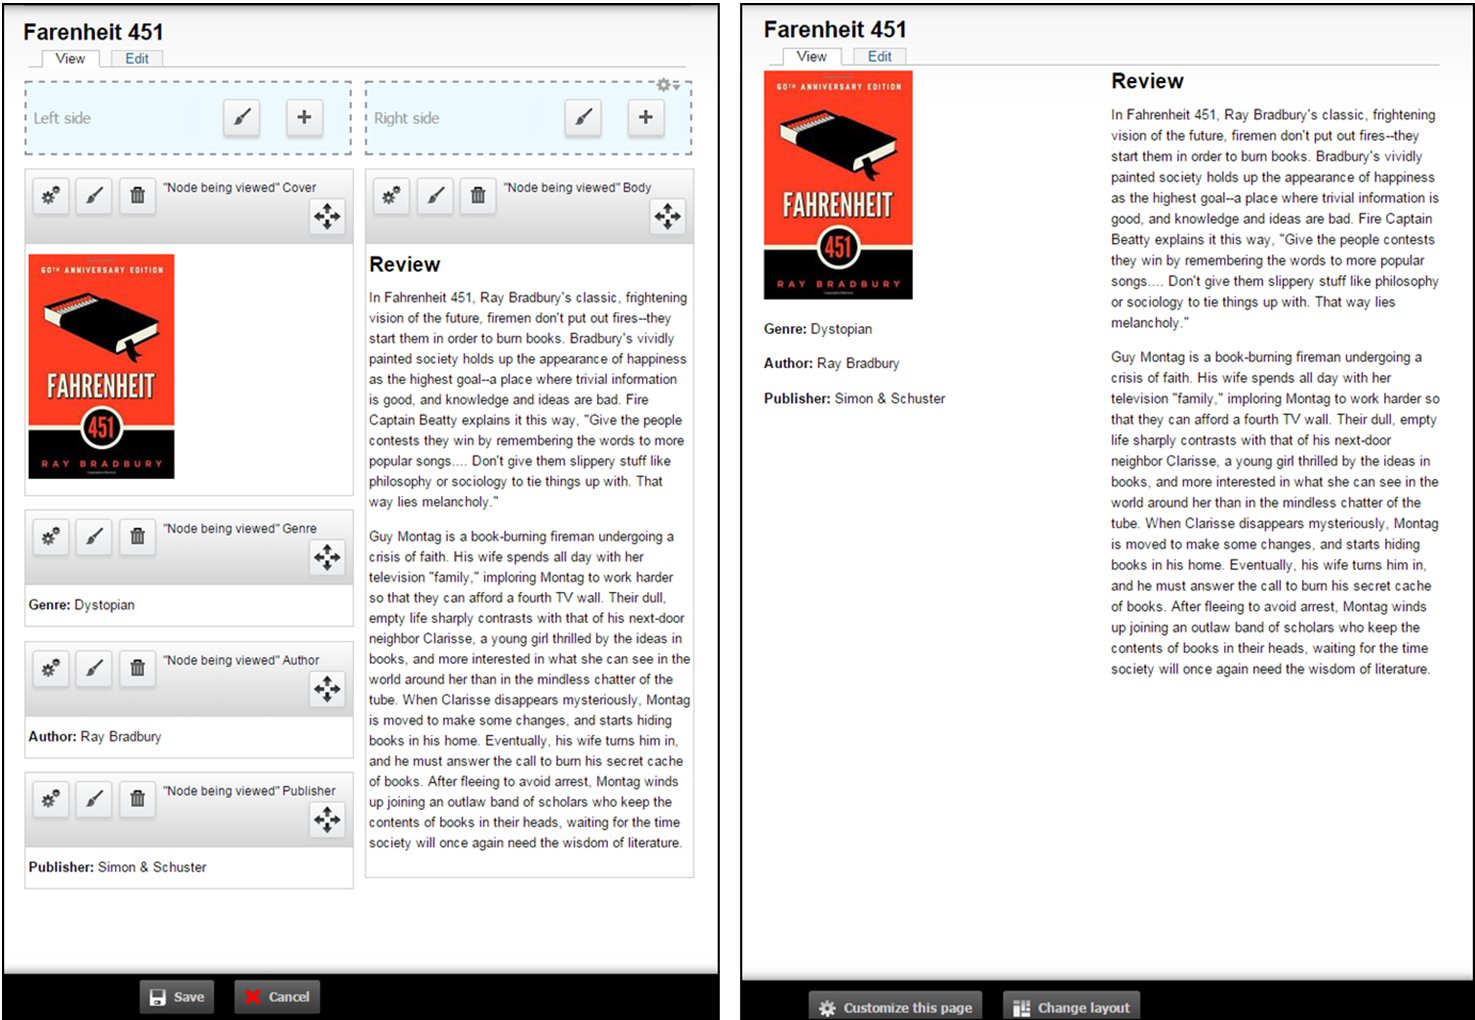
When we’re finished, this is what Left side looks like. But we should’ve put some of that content on Right side.
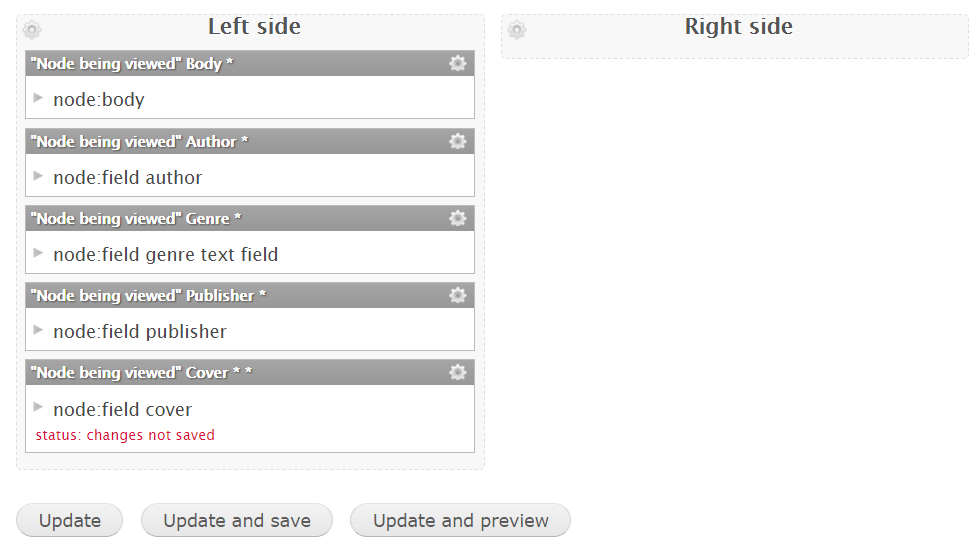
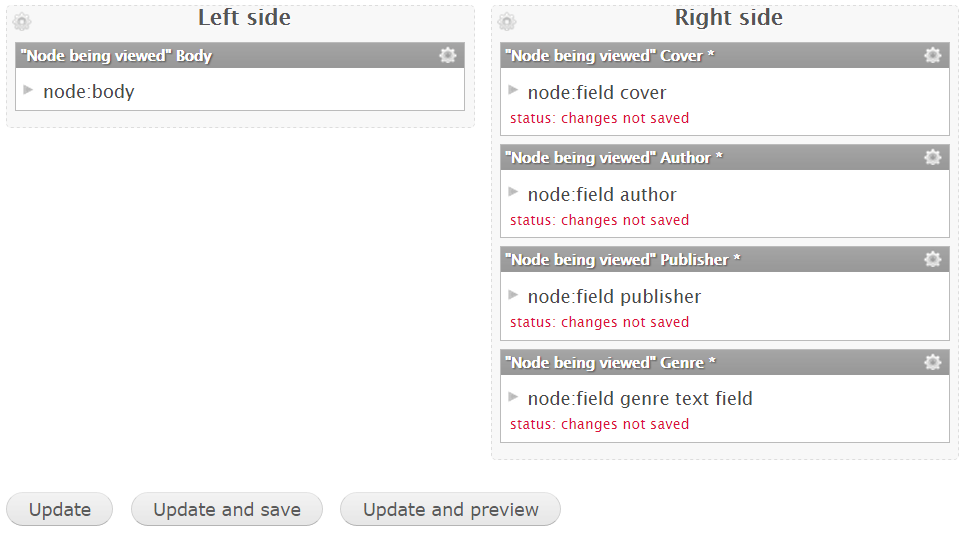
No problem. Panels lets you drag and drop content, so it’s easy to rearrange the pieces of node content. On Left side, we leave the body (the actual review) and drag over to Right side the the cover image, author, publisher, and genre.
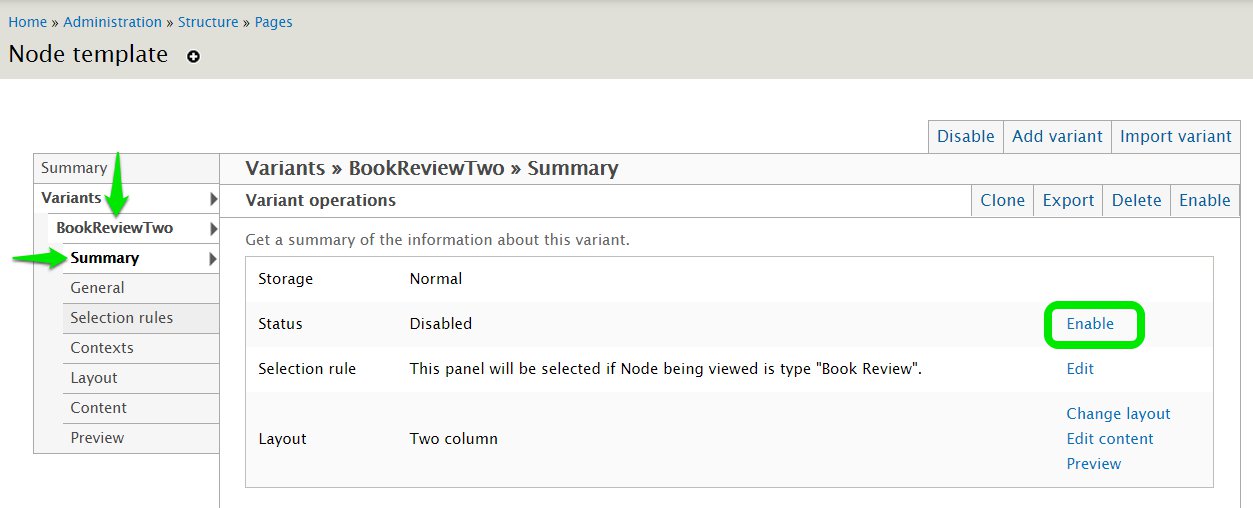
The important thing to remember is to Update and Save. Once you do so, the changes take effect and become permanent. You’ll see that the Node template menu now lists our new variant, BookReviewTwo. To make this new variant take effect, we must Enable it from the Summary page for this variant, and then Save.
Now when a user views a book review, content in the sidebar remains the same, but the book review information is arranged in two columns.
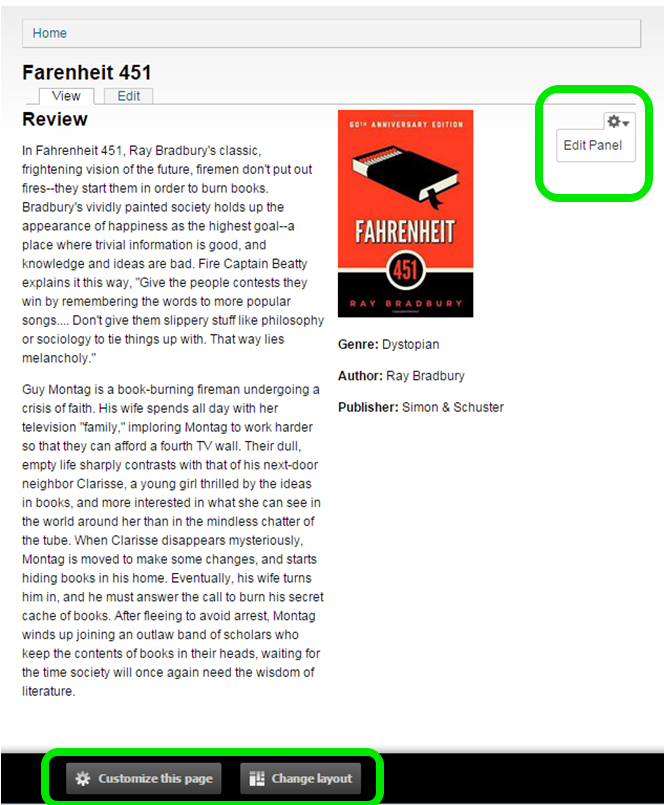
If you move your mouse to the top right of the content, the cog for Edit Panel will appear. This means that in addition to going through Administration / Structure / Pages you can access this variant’s panel settings very conveniently straight from a rendered page.
In-Place editing
But that’s not all. Look at those tools at the bottom of the page (above, in green). Remember the In-Place Editor? If you don’t like how this layout looks now that you’ve seen it rendered, you can click on Customize this page to bring up a drag and drop layout that lets you move content around or add more content. Or you could click on Change layout to change the column layout.
In the example below, we have decided to switch around content in the columns (left, below) resulting in the presentation on the right.
If we go into Administration / Structure / Pages / Node template and look at variant BookReviewTwo’s Content, we see the changes reflected.
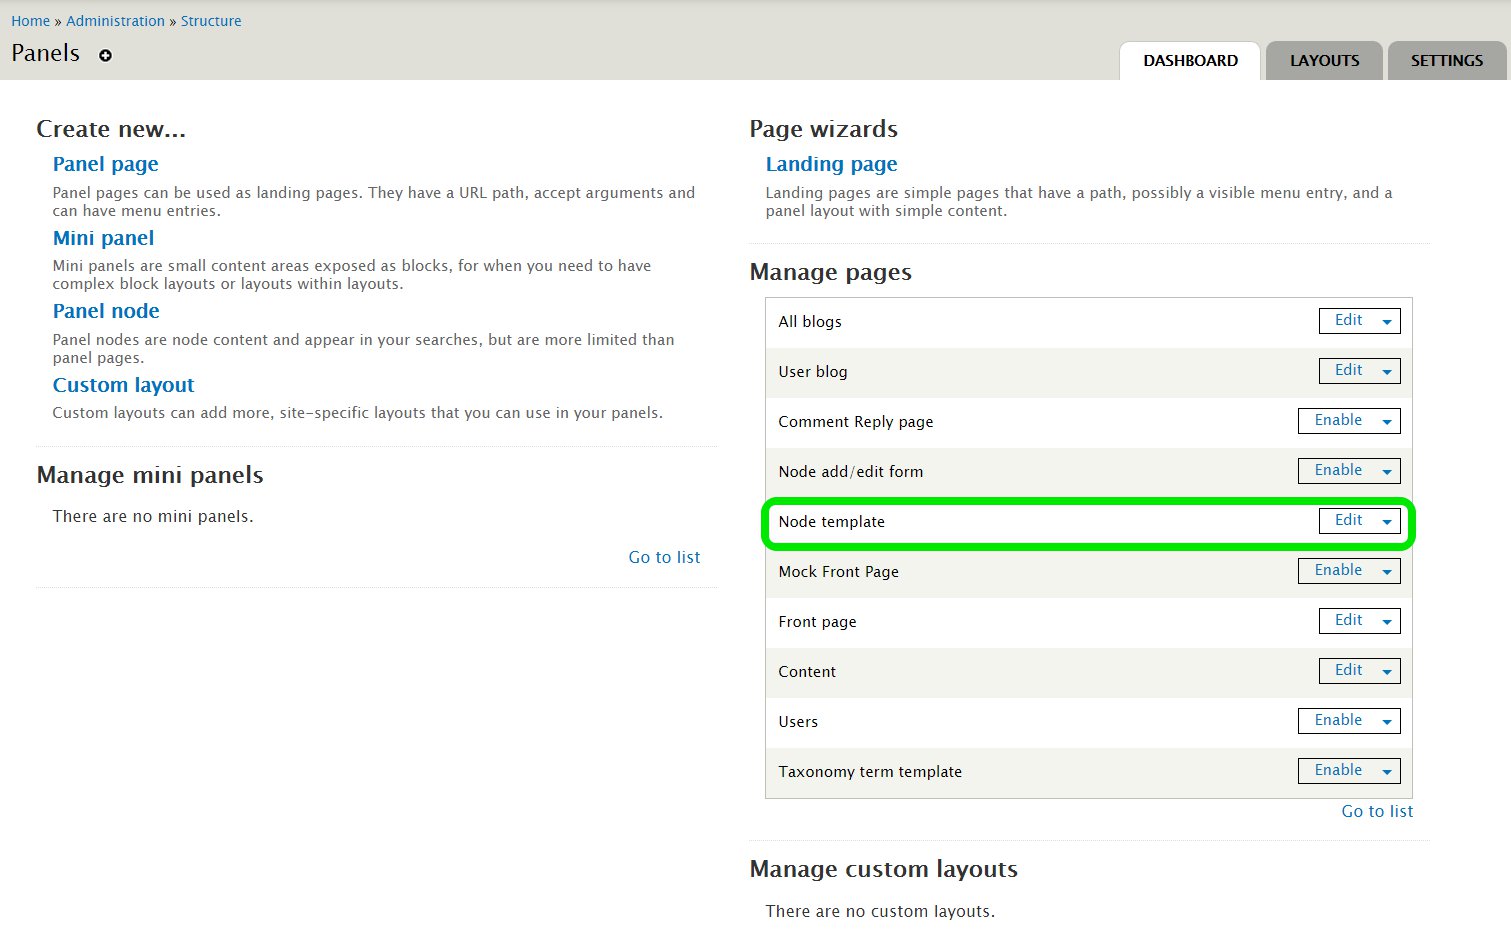
Accessing Panels
There is one more way to access Panel settings – and that’s via Administration / Structure /Panels. On this Dashboard, we see all the Panel options we’ve installed and also the pages that Panels can control – including Node template. It’s a less cluttered version of Administration / Structure /Pages.
How to disable the panel layout
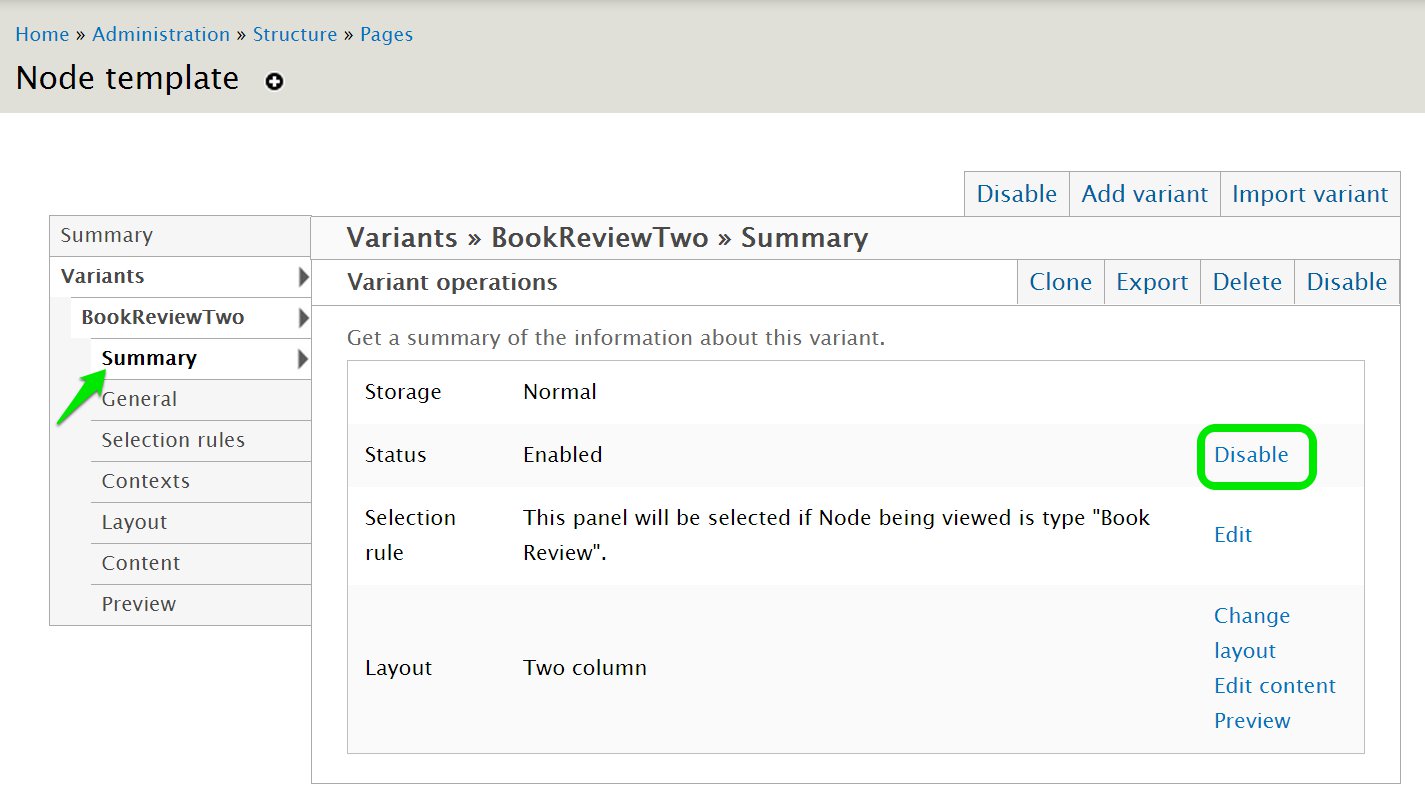
If we want to go back to the original default layout for content type Book Review, all we have to do is Edit Node template to access the Node template summary page, and from there Disable the variant BookReviewTwo.
What just happened, really?
Panels do not alter a theme. We have not added code to the theme, created a new page template, or gotten rid of any of the original settings. Panels simply provide a different way of displaying a content type. If we add or edit a book review, content editing remains the same. If we take a look at the fields for content type Book Review, the fields remain the same.
Drupal keeps data and presentation separate, and Panels adhere to this rule. This makes the next topic extremely easy to understand.
How to create a new content type with a different layout
By now you’ve figured out that we use Panels to display content with a different look than what the default theme provides. Therefore, creating a new content type with a different layout than your theme is really a two-step process:
- Create a new content type: define all the fields and settings as usual
- Change its look: use Panels to change layout, disable blocks and regions, or add other elements.
Simple!
Recommendations
Limit access. Panels offer site editors and advanced content editors enormous flexibility, so be sure to check Administration / People settings for Permissions and Roles to make sure only authorized, capable users can access Panels and Page Manager functions.
Test out Panels. There are many more options and settings in the Panels module than this blog can cover. If you don’t already have a staging site or even just a desktop configuration for Drupal, get one. It’s your best bet for trying out Panels and getting familiar with its capabilities. Furthermore, a staging site is a great way to collaborate with a designer; you may need help refining layouts to ensure they meet your website and branding requirements.
Monitor performance. Too many panel layouts slow down performance. Modules such as panels content cache, panels hash cache, and panels page cache can help minimize the performance hit, but always remember that your website is part of an infrastructure, so keep the big picture in mind and check other possibilities.
Review website requirements. Finally, while Panels are powerful and allow site editors to make changes to the look of a website, frequent tinkering to create new layouts could be a sign that the site no longer meets a company’s needs. It may be time to revisit your requirements and update your website.
Whether you need a website planning roadmap or design and development, Smartt provides together the marketing, technical, and project management expertise you need for an effective Drupal website. Contact us to learn more.

