 Branding
 Digital Marketing
 Web & App Dev
 IT Services
Configuring CKeditor for Better Usability

Most Drupal sites use CKeditor, the HTML text editor that provides WYSIWYG editing functionality to users. CKEditor is so popular that it will be included with Drupal 8. While CKEditor is pretty much install-and-go, there are some configuration tricks you can use to make life easier for your users – it’s both safer and more convenient. Some users, such as content editors, need to use more features. Others, such as visitors who post comments, do not.
If you don’t have CKEditor, (Drupal 7) you will need to install both the CKEditor module and the Drupal Libraries API or you can install the WYSIWYG module with CKEditor (https://www.drupal.org/node/2442821).
The Basics: Permissions and Roles
Who can use CKEditor and to what extent? Once you have installed CKEditor and you can see it in your list of Modules, go to Administration » People » Permissions to check the Permission settings for CKEditor.
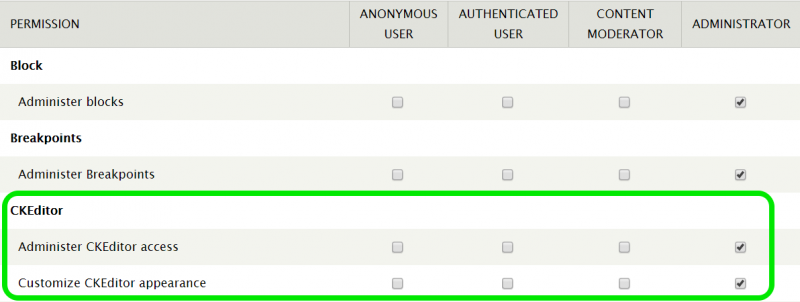
Content editors don’t need to administer or customize CKEditor in order to use it; however, if you do have users who have the expertise and the need to configure CKEditor, you can grant access here. The best way to do this is to create a new user role (i.e. “content admin”) and set CKEditor permissions accordingly.
Security: Filtering Out the Bad Stuff
Like other WYSIWYG editors, CKeditor supports HTML. The HTML gets interpreted by the web browser. This makes CKEditor’s (and other WYSIWYG editors’) fields vulnerable to Cross-Site Scripting (XSS) attacks. Users will also cut and paste from Word, which could result in markup that isn’t supported by your theme’s CSS.
Therefore, content must be filtered for malicious code and unwanted tags before it is loaded. CKeditor has default filters in place. To take a look at the filters, scroll down the list of Permissions to Filter, and you’ll see that the default format for Anonymous and Authenticated users is Filtered HTML.
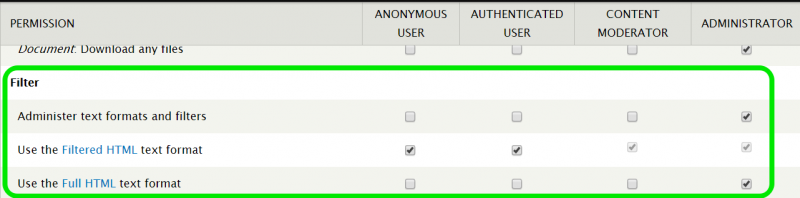
In simplistic terms, Filtered HTML means CKEditor will strip out Javascript and CSS as well as any HTML tags which aren’t set in your ‘safelist’; generally the tags are for HTML functions not relevant to text editing. Also by default, only the Administrator role can administer text formats and filters.
To see exactly what Filtered HTML is filtering out (your ‘safelist’), click on the ‘Filtered HTML’ link. Take a look at the Filter Settings section. This is where you can view and edit the default HTML tags which define the filter. Any HTML not on that list gets stripped out. This helps protect against situations where hackers inject malicious code. The more tags you add, the more functionality you allow in editing.
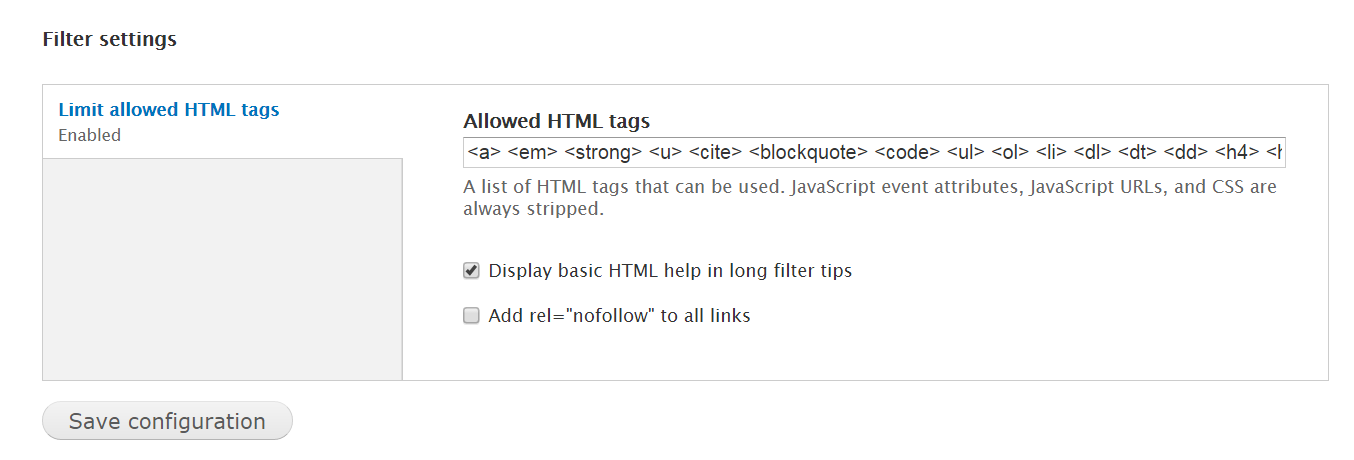
You want to allow only HTML that’s relevant to text formatting while providing content editors the ability to use all the formats and styles in your website’s theme securely.
Toolbars and buttons
If you want to provide your users with WYSIWYG text editing, you need to strike a balance between security and convenience. One way to do this is by configuring the CKEditor toolbar to fully support the text attributes your theme’s CSS provides -- and remove buttons for text features it doesn't provide. It's frustrating for users to format text in the editor only to discover the style doesn't render on the published page.
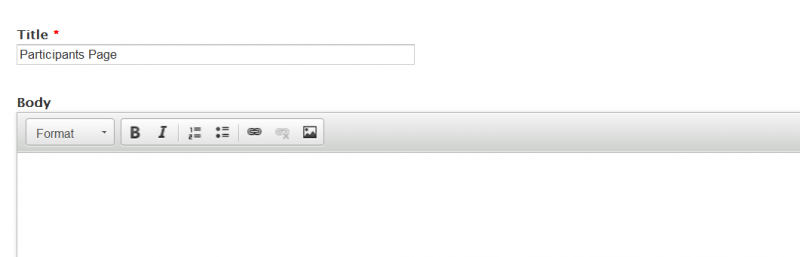
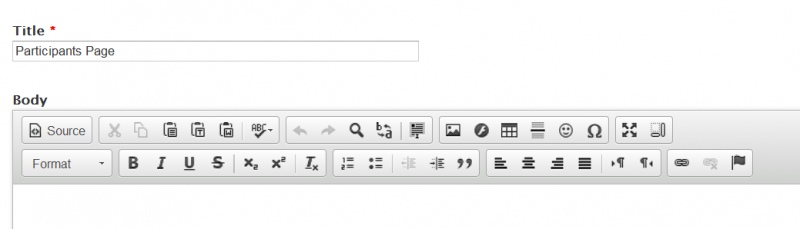
Below is CKEditor as a user sees it, configured with just the Basic toolbar.
If the only text formats your theme allows are Bold, Italic, bullet points, links, and images – that Basic toolbar is just fine. However, if your text formats include colors, headings, different font styles, then your users – especially content editors – will need access to those features. To do this, go to Configuration » Content authoring » CKEditor and select edit for the Advanced profile (which uses the Filtered HTML input format). Under Editor Appearance, you’ll see the option to load either the Basic, Advanced, or Full toolbar.
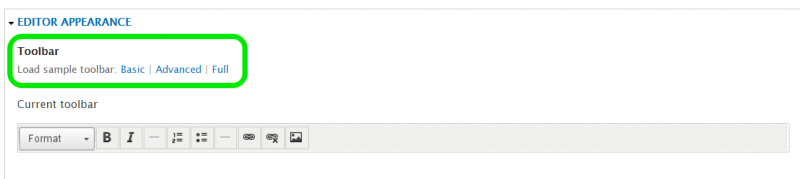
In this example, we select the Advanced toolbar and SAVE the configuration. This is how the user’s CKEditor toolbar now displays:
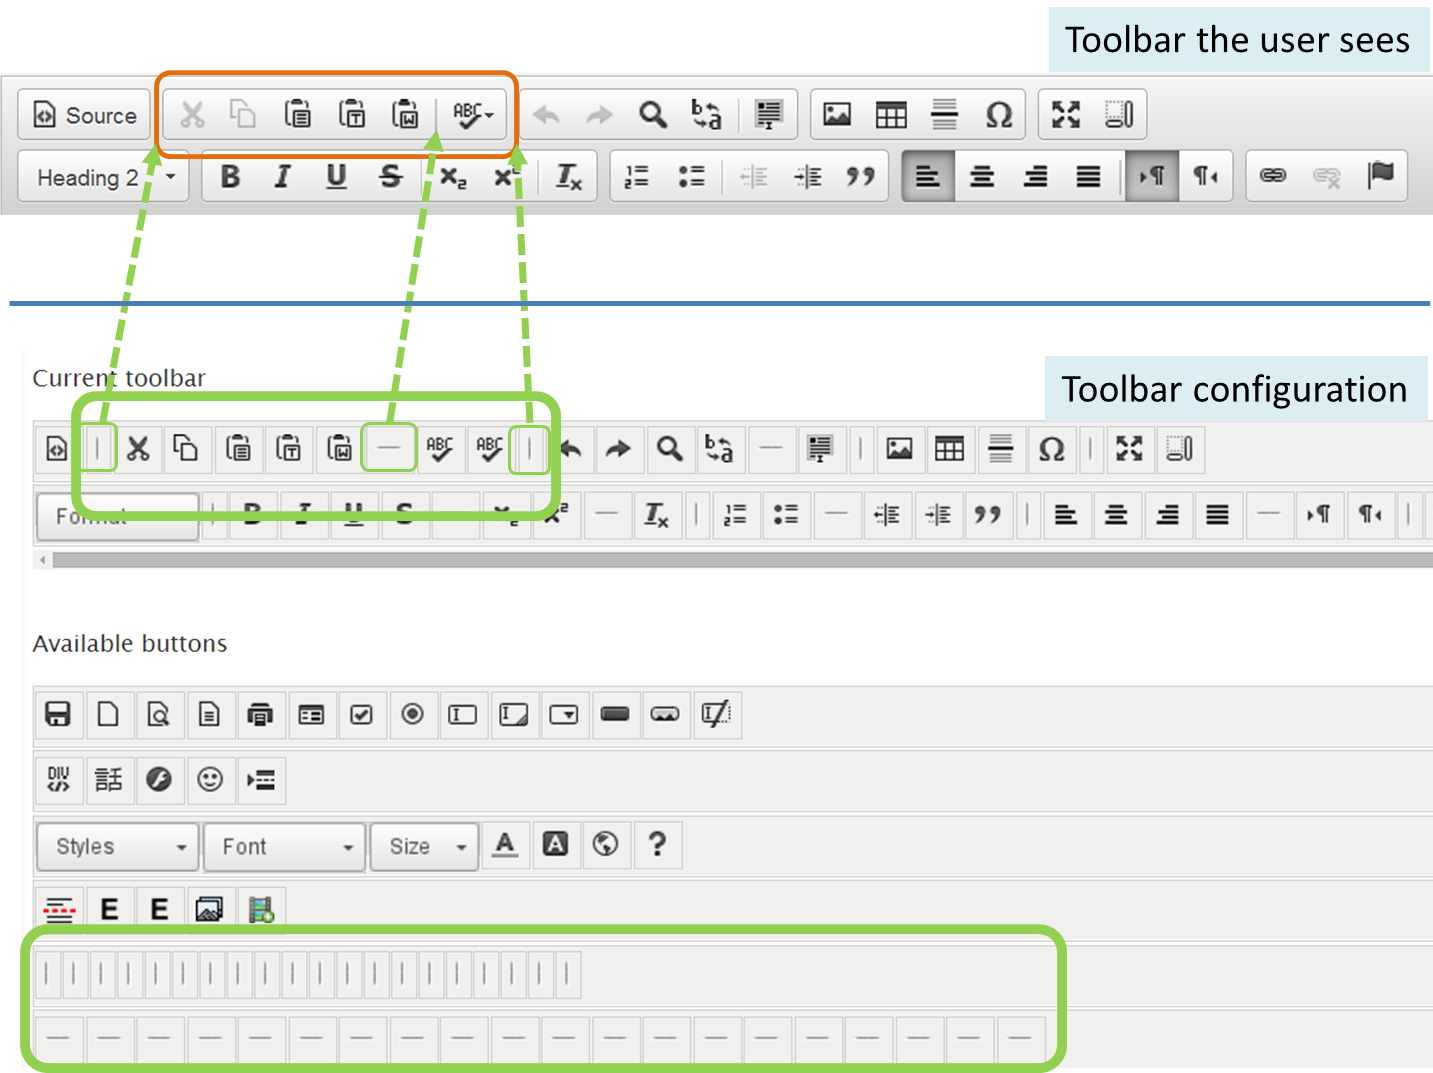
You can add or remove buttons from the toolbar, which is one way to prevent users from adding formats/HTML you don’t want in your content or to give them more features. You do this by dragging unwanted buttons from the Current toolbar to the Available buttons area, and vice versa. In the example below, we don’t want Flash or emoticons inserted in content, so we can drag those icons off the toolbar. This allows you to configure the toolbar to contain only buttons which are relevant to your theme.
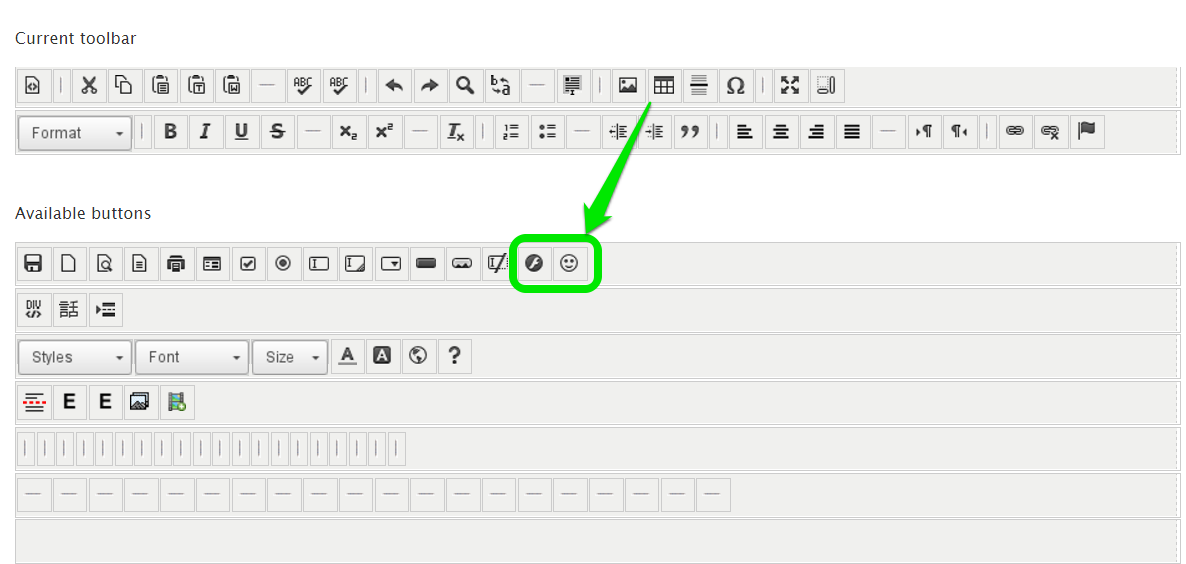
You can also move buttons around and group them. To group buttons together, simply drag a vertical pipe icon (“ | “) from the Available buttons and put one on either side of the buttons you want grouped together on the toolbar. The dash icon (“ – “) inserts a vertical line spacer between buttons.
Make CKEditor match your theme CSS
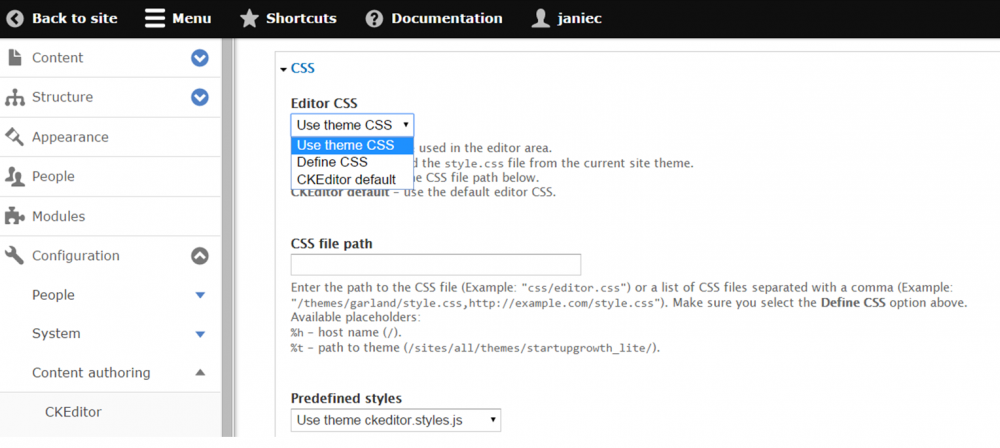
To deliver as WYSIWYG a user experience as possible, make sure CKEditor uses styles from your theme’s CSS instead of the CKEditor default styles. To do this, go to Configuration » Content authoring » CKEditor, select the CKEditor profile (Advanced, Full, etc.) and under the CSS settings, select Use theme CSS.
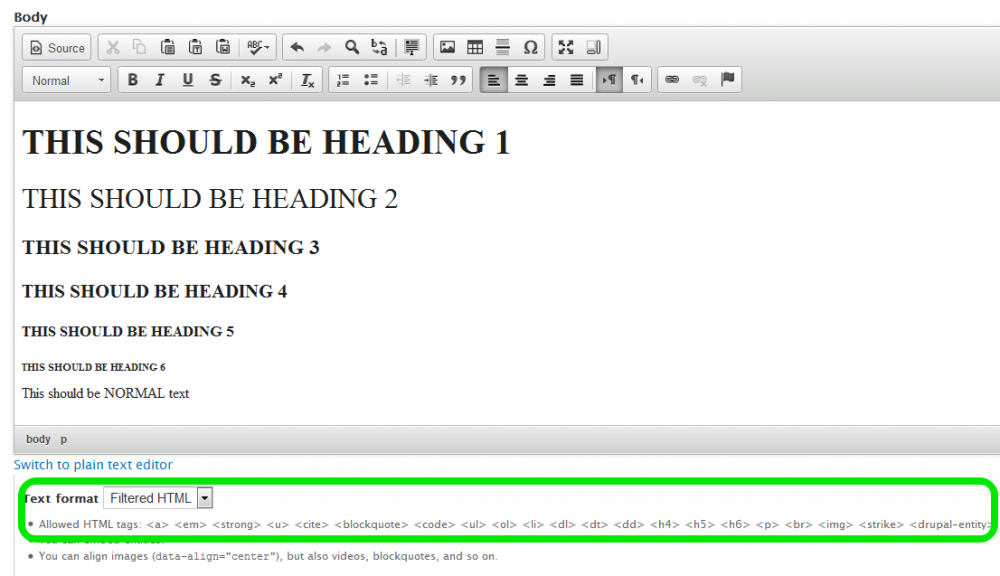
For this example, we are configuring the Advanced profile, which uses the Filtered HTML input format. Here is a page of content in View mode:

Yet when you take a look in Edit mode, you can see although heading formats 1 – 3 have been applied, they’re not rendering as such on the published page above. This is because of HTML filtering: H1, H2 and H3 are not on the list and therefore not allowed.
So you need to edit your Filter Settings to add those tags to the list of allowed HTML tags. Once we do this:
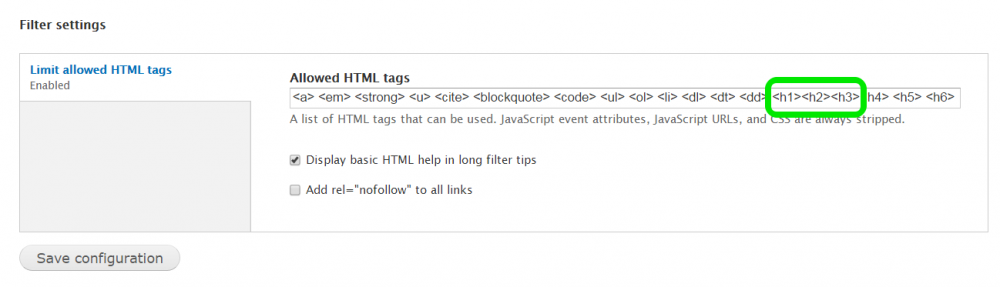
… and SAVE, we can view the page and see that the H1 – H3 heading formats are allowed and now display properly:

Those missing heading tags were easy to spot and fix. However, your theme could contain many other customized formats and settings such as: fonts, styles, colors, quotes, lists, and tables, not to mention links and image references. For the best WYSIWYG user experience, you want CKEditor to support your theme. Depending on the CSS for your website, it could be easy to identify all the tags. If it isn’t, then work with your web designer/developer and get a list of the tags which should be allowed.
Restricting Content Types to Text Only
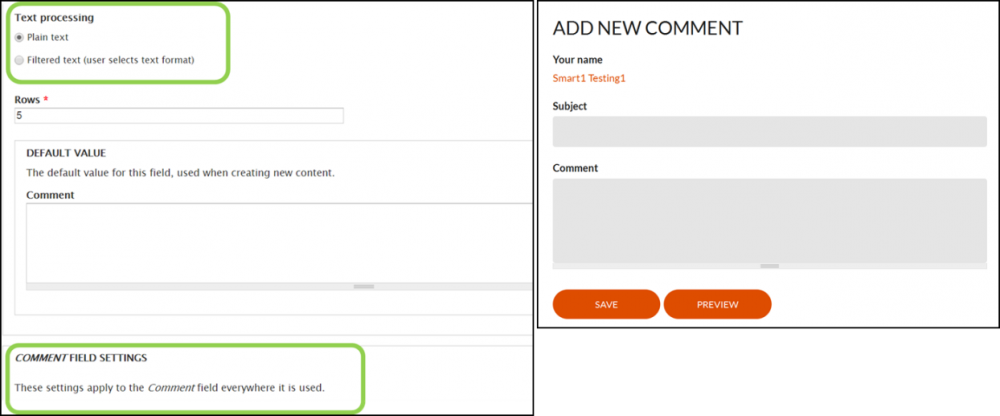
You can also control the use of CKEditor and HTML input by content type. For example, if you allow anonymous users to make comments on Posts, you would want comments to be text only. To do this, go to Administration » Structure » Content types » Post and click on the Comment Fields tab. Then set the Comment field to Plain text (left). Now when anyone wants to make a comment to a Post, they won’t see a CKEditor toolbar, just a text field (right).
In a web development project, the front end customer-facing pages get the most attention. For ongoing maintenance and updates, however, a well-configured back end that’s easy to use promotes productivity, professional results, and content that’s easy to refresh. At Smartt, we deliver websites that clients can update and edit on their own with very little support. If you have questions about web development and design, get in touch.

